![[New] Integrating Past Videos Into Current Live Feeds on FB for 2024](https://thmb.techidaily.com/3dc1e13d990f9f4ed1b30979889fa15d157b3da05c97d832955a545581c7804d.jpg)
[New] Integrating Past Videos Into Current Live Feeds on FB for 2024
Integrating Past Videos Into Current Live Feeds on FB
Facebook Video Editor - Wondershare Filmora
Provide abundant video effects - A creative video editor
Powerful color correction and grading
Detailed tutorials provided by the official channel
You must have thought of streaming a Facebook live pre-recorded video at least once in your social media duration. But things must have been too confusing! Pre-recorded video is where you already have a video on your device.
Likewise, live video means streaming something that’s current and ongoing. So, the combination of both may not seem possible. Fortunately, that’s not the case. If you have a video on your device and want to stream it live on Facebook, there are ways to do so. Also, there is no such tech-hassle to perform this process.
Just some simple steps would do! Here’s a quick guide to the same:

- LiveReacting
- Open Broadcaster Software
- Restream
In this article
Part 1: How to Make Pre-Recorded Facebook Videos?
Part 2: How to Post A Pre-Recorded Video Live on Facebook?
Part 1. How to Make Pre-Recorded Facebook Videos?
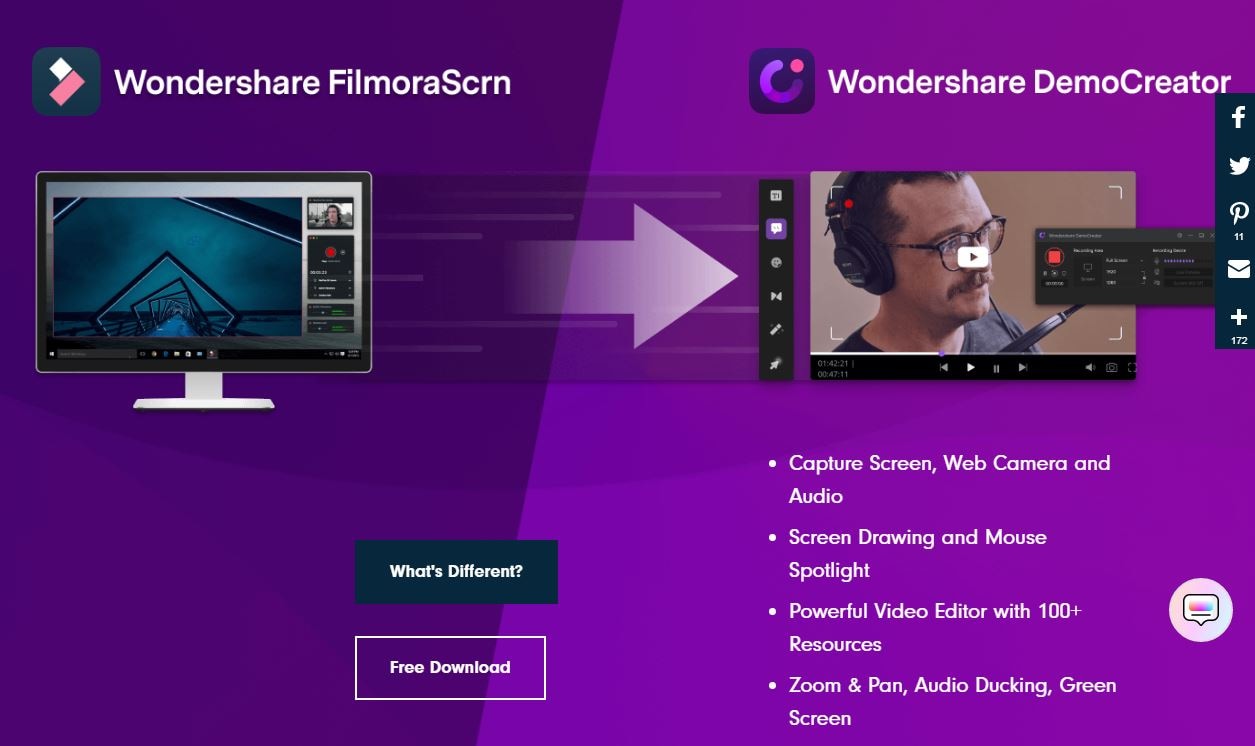
Be it the content of the recorded video or any other reason; you may stream a pre-recorded Facebook video for multiple motives. Now, the appropriate way to do so is through video recording/editing softwares like Wondershare Filmora. With multiple formats supporting and an in-built video recorder, this tool is a complete package for live streamings.
It also has more than 300 effects for different domains. Besides Facebook Live, the tool also allows you to burn the video to DVD or stream on YouTube. It’s an efficient way to transfer video to any famous portable device. The tool comes with an effortless user interface where you can employ videos in any possible way. It also records your screen to help you with hassle-free streaming. The process of recording is quite straightforward and involves the following steps:
- Install and open the Wondershare Filmora software. Double click on its desktop icon to launch the “Full Feature” mode.
- Go to the Record menu and click on “Record PC Screen”. This will instantly initiate a screen recorder window on your PC screen. Make sure to modify the settings for your video streaming.
- Look for a rectangular icon beside the Wondershare screen recorder window. It’s a feature through which you can select an area that you want to record. Select anyone from the three options, i.e. Full Screen, Custom, or Target Window. While the Full-Screen option records your entire screen, the Custom option allows you to modify a screen section for recording.
If you want, you can resize the area or make adjustments through custom resolutions (width and height). Lastly, the Target Window allows you to select a program, browser or any other window for recording. - For voice and sound, select the Microphone icon. This will help you choose a mic to record the content for your streaming. Select the Speakers option if you want to employ them in your live video.
- Look for the Settings option in your window and click on it. It’s situated on the lower right side of the screen. This will open a plethora of options to customize the pre-recorded video for live streaming:
- **Save to:**To select the location on your PC where you want to save the recording.
- **Frame rate:**To choose the appropriate frame rate for recording.
- **Quality:**To select from the multiple quality options (good, better, best) for streaming.
- **Record Timer:**To assign a time slot where your recording stops automatically. Do not tick the option if you want manual customization.
- **Mouse:**To select if you want to display the mouse clicks during the recording.
- **Pause/Resume Hotkey:**To select a keyboard key for pausing and resuming the recording.
- **Start/Stop Hotkey:**To select a keyboard key to start or stop the recording.
- **Camera:**Tick this box if you want content from the webcam to display on the recording. If you choose this option, your webcam feed will be visible on the screen. Place them in the right position before recording. However, do not move past the recording area.
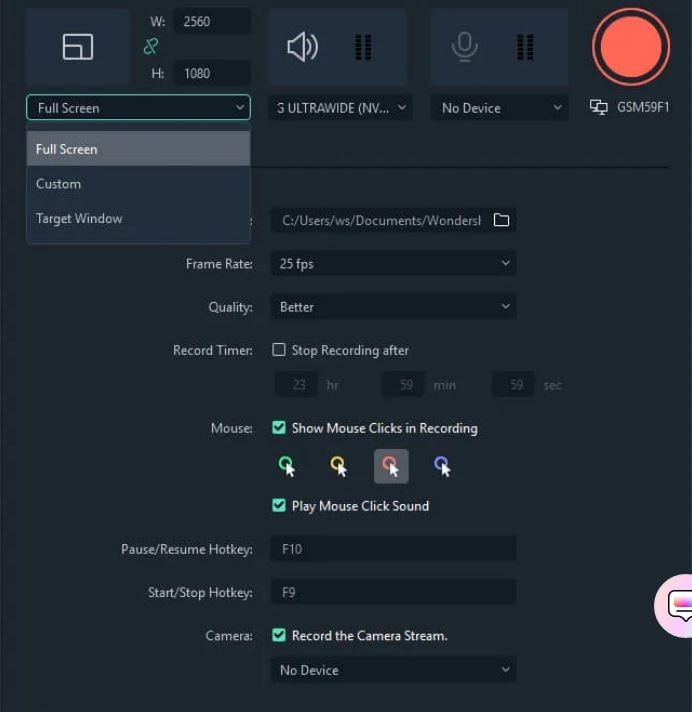
- Click on the Rec button to initiate the streaming. The same will start after 3 seconds. If you want to stop the ongoing recording, press the F9 button.
Part 2. How to Post A Pre-Recorded Video Live on Facebook?
Other than that, there are numerous platforms through which you can post a pre-recorded video live on Facebook. It comes with top-notch features that allow you to schedule streams efficiently. While it may be a bit too much for beginners, it’s still worth trying for your live streaming. Let’s know about them in detail:
LiveReacting
LiveReacting is a cloud-based tool that helps you to upload pre-recorded videos to Facebook Live. As it’s cloud-based, there are no scenarios of any third-party involvement. It renders numerous efficient features like auto-uploads, countdowns, quizzes, and logo addition to the live video. Here’s how you can use the platform for streaming pre-recorded video live on Facebook:
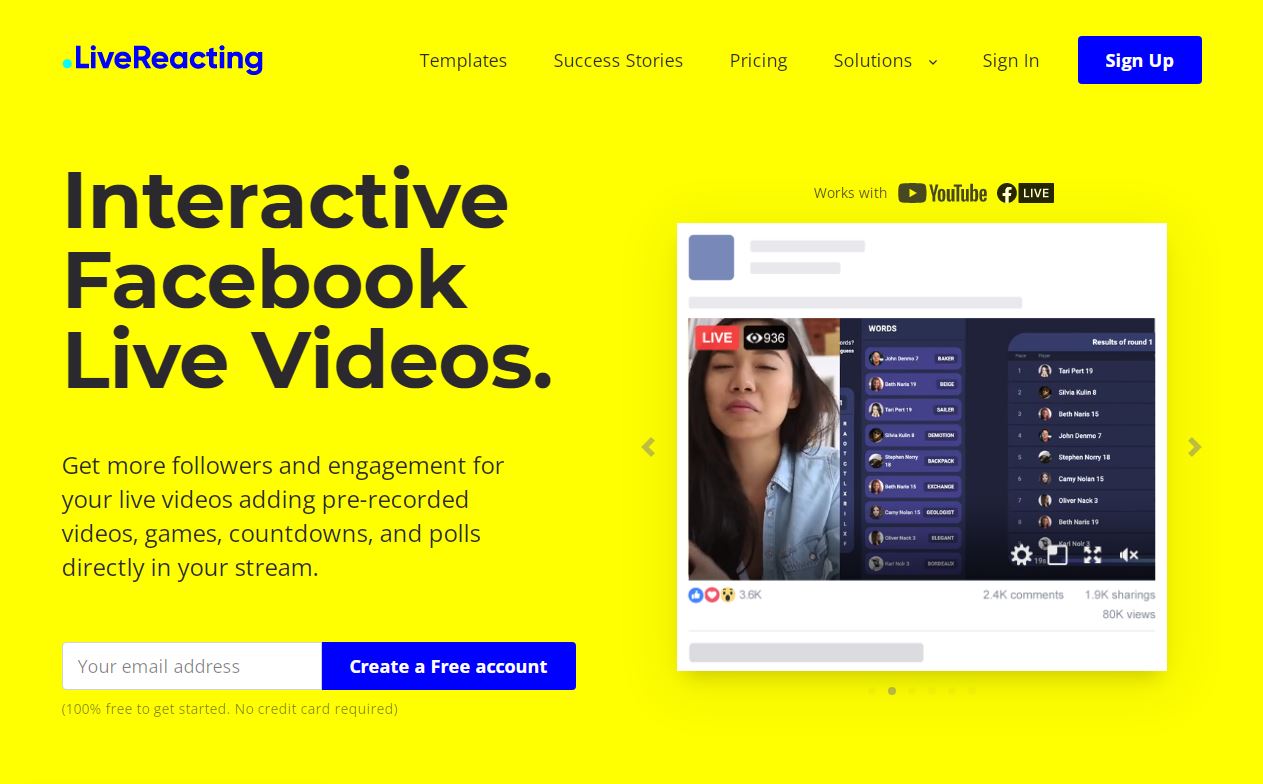
- Go to LiveReacting and log in to your account. Select a template or go to the studio to launch a new project.
- Upload the video that you want to live stream. For that, you can navigate to the video layer of the editor and then click on the “Select file” option. Once you see the file manager, select whether you want to upload a new file or upload something that was previously uploaded.
- Modify the streaming settings by choosing the social account where you want to go live on. Mention the title, description, adjust stream duration, and schedule any automatic uploads if you want to.
- After making the adjustments, click on “Go Live”. This will broadcast your video in 5-4 seconds.
Open Broadcaster Software
While the process may be a bit complex, Open Broadcaster Software allows you to stream pre-recorded video live on Facebook for free. It’s an outstanding open-source platform that ensures efficient screencasting, recording, and Live streaming. Live videos get more viral than conventional videos. Thus, its popularity is obligatory.
Start by launching the Stream key to enable the use of streaming software. Do not disclose the Stream Key to anyone as it may be misused. The validity of the Stream key is around seven days. Also, you have around 5 hours to stream your video live (after the preview). Launch any new key for more time. Here’s how to do so:
- Go to your Facebook account and click on Publishing Tools. From there, navigate to Video Library and +Live.
- Click on Next and wait for the “Create Live Video” option to appear. Keep the window as it is and move on to the configuration of OBS.
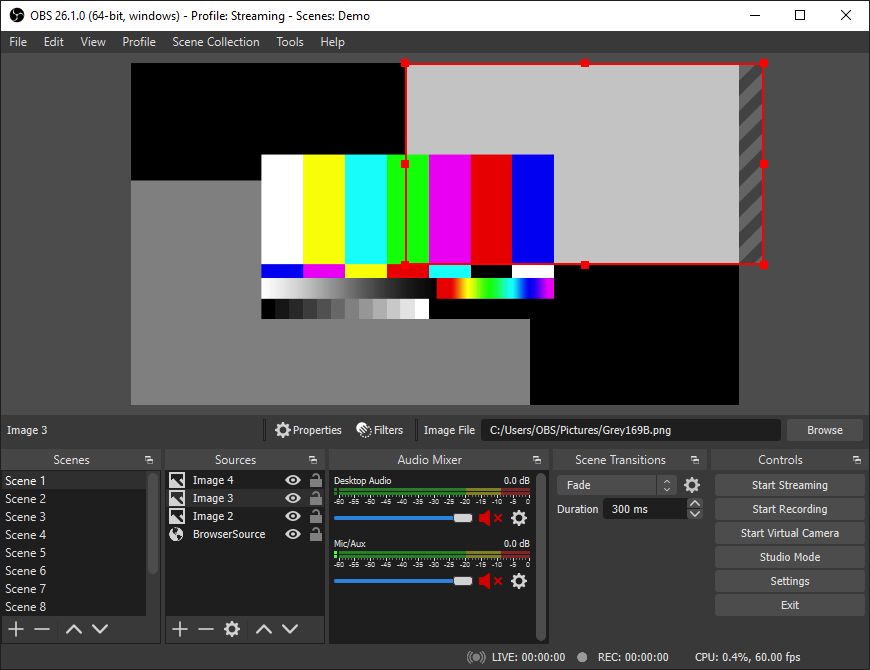
- Download and start the Open Broadcaster Software on your PC.
- Go to Settings and then to the stream. Input the Stream key and click on OK.
- Navigate to the Sources section and click on the ‘+’ icon. Choose the VLC video source.
- Add videos and create a playlist. Assign a name to the playlist and click on the OK button. Customize the settings on how you want to stream the video. If you want to stream even after window minimization, click on “Always play even when not visible”.
- The “+” icon allows you to add multiple videos. Make sure to do so if you want to feature a list of videos. Once done, click on the Ok button and mute the Mic/Aux. Now, click on the Start Streaming button.
- Navigate to the Facebook window and click on the “Go live” button.
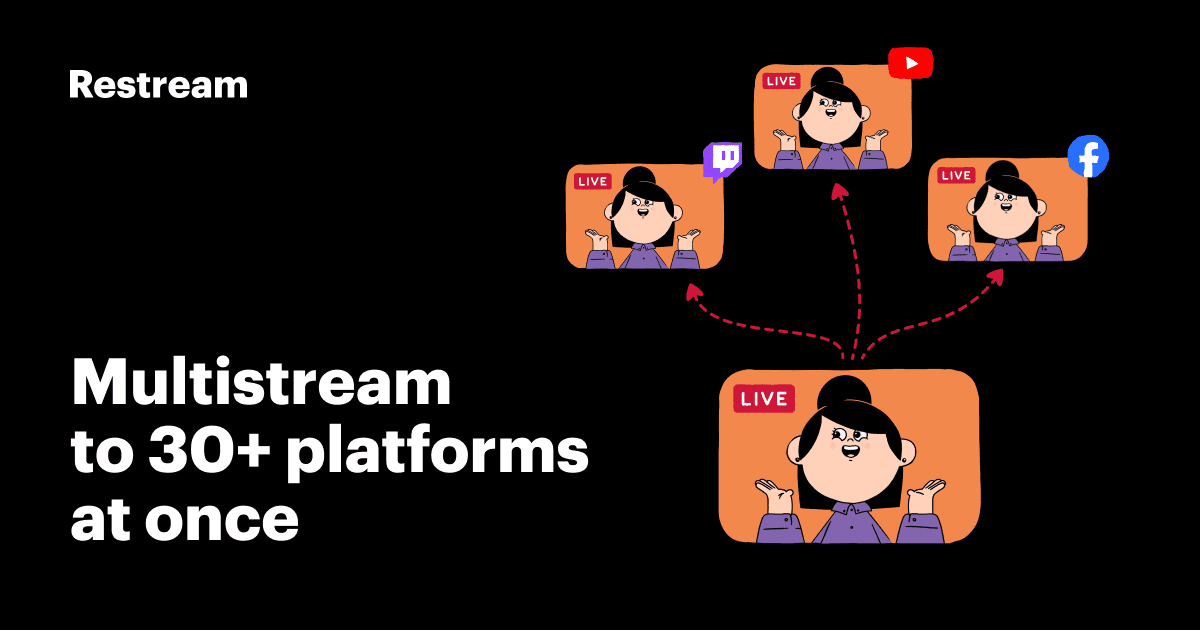
Restream
Started as a multi-stream tool, Restream allows you to upload and reschedule pre-recorded video live on the Facebook page. Not just Facebook, it’s a powerful live-streaming tool that ensures broadcasting in more than thirty streaming channels. That too, simultaneously! It comes with an easy user interface where you can follow the below steps for pre-recorded video scheduling.
- Create and edit pre-recorded video and sign in to your Restream account.
- Look for the “Video Storage” button on the dashboard. It’s normally located on the left side of the same.
- Check whether you can see an “Upload Video” button (blue color) situated at the top right side. Now, click on the button to upload the pre-recorded video.
- Following that, click on the Event button. It is situated at the left sidebar. Then, click on Schedule Live Event.
- Choose the Video File option from the list. Select the uploaded video and schedule the time and date for streaming.
- Input the title and description as you want. Choose Facebook from the platforms where you want to stream the video. And that’s how you put a pre-recorded video on Facebook live through Restream.
Now, for pre-recording your video, one of the most feasible tools is Wondershare Filmora. Not only does it ensure high-quality streaming, but it also renders impress and useful features.
The intuitive user interface and simple steps ensure the video records in a hassle-free manner. The tool does not have any complicated configuration. Thus, it can save your time from all the inconvenience. Also, below powerful features make it a must-use for recordings:
- Simultaneous recording from both screen and webcam
- Mouse spotlight feature to highlight the essentials
- Write and draw on the recording
- Fade in and fade out for audio
- Zoom and pan on a particular area
Conclusion
So, that’s the process of how to go live on a Facebook page with a pre-recorded video. As live videos are becoming more popular, it’s worth using them as a medium to interact with your followers. Try these steps now to stream your pre-recorded video in a blink! Hopefully, these methods solve your problem.
You must have thought of streaming a Facebook live pre-recorded video at least once in your social media duration. But things must have been too confusing! Pre-recorded video is where you already have a video on your device.
Likewise, live video means streaming something that’s current and ongoing. So, the combination of both may not seem possible. Fortunately, that’s not the case. If you have a video on your device and want to stream it live on Facebook, there are ways to do so. Also, there is no such tech-hassle to perform this process.
Just some simple steps would do! Here’s a quick guide to the same:
- LiveReacting
- Open Broadcaster Software
- Restream
In this article
Part 1: How to Make Pre-Recorded Facebook Videos?
Part 2: How to Post A Pre-Recorded Video Live on Facebook?
Part 1. How to Make Pre-Recorded Facebook Videos?
Be it the content of the recorded video or any other reason; you may stream a pre-recorded Facebook video for multiple motives. Now, the appropriate way to do so is through video recording/editing softwares like Wondershare Filmora. With multiple formats supporting and an in-built video recorder, this tool is a complete package for live streamings.
It also has more than 300 effects for different domains. Besides Facebook Live, the tool also allows you to burn the video to DVD or stream on YouTube. It’s an efficient way to transfer video to any famous portable device. The tool comes with an effortless user interface where you can employ videos in any possible way. It also records your screen to help you with hassle-free streaming. The process of recording is quite straightforward and involves the following steps:
- Install and open the Wondershare Filmora software. Double click on its desktop icon to launch the “Full Feature” mode.
- Go to the Record menu and click on “Record PC Screen”. This will instantly initiate a screen recorder window on your PC screen. Make sure to modify the settings for your video streaming.
- Look for a rectangular icon beside the Wondershare screen recorder window. It’s a feature through which you can select an area that you want to record. Select anyone from the three options, i.e. Full Screen, Custom, or Target Window. While the Full-Screen option records your entire screen, the Custom option allows you to modify a screen section for recording.
If you want, you can resize the area or make adjustments through custom resolutions (width and height). Lastly, the Target Window allows you to select a program, browser or any other window for recording. - For voice and sound, select the Microphone icon. This will help you choose a mic to record the content for your streaming. Select the Speakers option if you want to employ them in your live video.
- Look for the Settings option in your window and click on it. It’s situated on the lower right side of the screen. This will open a plethora of options to customize the pre-recorded video for live streaming:
- **Save to:**To select the location on your PC where you want to save the recording.
- **Frame rate:**To choose the appropriate frame rate for recording.
- **Quality:**To select from the multiple quality options (good, better, best) for streaming.
- **Record Timer:**To assign a time slot where your recording stops automatically. Do not tick the option if you want manual customization.
- **Mouse:**To select if you want to display the mouse clicks during the recording.
- **Pause/Resume Hotkey:**To select a keyboard key for pausing and resuming the recording.
- **Start/Stop Hotkey:**To select a keyboard key to start or stop the recording.
- **Camera:**Tick this box if you want content from the webcam to display on the recording. If you choose this option, your webcam feed will be visible on the screen. Place them in the right position before recording. However, do not move past the recording area.
- Click on the Rec button to initiate the streaming. The same will start after 3 seconds. If you want to stop the ongoing recording, press the F9 button.
Part 2. How to Post A Pre-Recorded Video Live on Facebook?
Other than that, there are numerous platforms through which you can post a pre-recorded video live on Facebook. It comes with top-notch features that allow you to schedule streams efficiently. While it may be a bit too much for beginners, it’s still worth trying for your live streaming. Let’s know about them in detail:
LiveReacting
LiveReacting is a cloud-based tool that helps you to upload pre-recorded videos to Facebook Live. As it’s cloud-based, there are no scenarios of any third-party involvement. It renders numerous efficient features like auto-uploads, countdowns, quizzes, and logo addition to the live video. Here’s how you can use the platform for streaming pre-recorded video live on Facebook:
- Go to LiveReacting and log in to your account. Select a template or go to the studio to launch a new project.
- Upload the video that you want to live stream. For that, you can navigate to the video layer of the editor and then click on the “Select file” option. Once you see the file manager, select whether you want to upload a new file or upload something that was previously uploaded.
- Modify the streaming settings by choosing the social account where you want to go live on. Mention the title, description, adjust stream duration, and schedule any automatic uploads if you want to.
- After making the adjustments, click on “Go Live”. This will broadcast your video in 5-4 seconds.
Open Broadcaster Software
While the process may be a bit complex, Open Broadcaster Software allows you to stream pre-recorded video live on Facebook for free. It’s an outstanding open-source platform that ensures efficient screencasting, recording, and Live streaming. Live videos get more viral than conventional videos. Thus, its popularity is obligatory.
Start by launching the Stream key to enable the use of streaming software. Do not disclose the Stream Key to anyone as it may be misused. The validity of the Stream key is around seven days. Also, you have around 5 hours to stream your video live (after the preview). Launch any new key for more time. Here’s how to do so:
- Go to your Facebook account and click on Publishing Tools. From there, navigate to Video Library and +Live.
- Click on Next and wait for the “Create Live Video” option to appear. Keep the window as it is and move on to the configuration of OBS.
- Download and start the Open Broadcaster Software on your PC.
- Go to Settings and then to the stream. Input the Stream key and click on OK.
- Navigate to the Sources section and click on the ‘+’ icon. Choose the VLC video source.
- Add videos and create a playlist. Assign a name to the playlist and click on the OK button. Customize the settings on how you want to stream the video. If you want to stream even after window minimization, click on “Always play even when not visible”.
- The “+” icon allows you to add multiple videos. Make sure to do so if you want to feature a list of videos. Once done, click on the Ok button and mute the Mic/Aux. Now, click on the Start Streaming button.
- Navigate to the Facebook window and click on the “Go live” button.
Restream
Started as a multi-stream tool, Restream allows you to upload and reschedule pre-recorded video live on the Facebook page. Not just Facebook, it’s a powerful live-streaming tool that ensures broadcasting in more than thirty streaming channels. That too, simultaneously! It comes with an easy user interface where you can follow the below steps for pre-recorded video scheduling.
- Create and edit pre-recorded video and sign in to your Restream account.
- Look for the “Video Storage” button on the dashboard. It’s normally located on the left side of the same.
- Check whether you can see an “Upload Video” button (blue color) situated at the top right side. Now, click on the button to upload the pre-recorded video.
- Following that, click on the Event button. It is situated at the left sidebar. Then, click on Schedule Live Event.
- Choose the Video File option from the list. Select the uploaded video and schedule the time and date for streaming.
- Input the title and description as you want. Choose Facebook from the platforms where you want to stream the video. And that’s how you put a pre-recorded video on Facebook live through Restream.
Now, for pre-recording your video, one of the most feasible tools is Wondershare Filmora. Not only does it ensure high-quality streaming, but it also renders impress and useful features.
The intuitive user interface and simple steps ensure the video records in a hassle-free manner. The tool does not have any complicated configuration. Thus, it can save your time from all the inconvenience. Also, below powerful features make it a must-use for recordings:
- Simultaneous recording from both screen and webcam
- Mouse spotlight feature to highlight the essentials
- Write and draw on the recording
- Fade in and fade out for audio
- Zoom and pan on a particular area
Conclusion
So, that’s the process of how to go live on a Facebook page with a pre-recorded video. As live videos are becoming more popular, it’s worth using them as a medium to interact with your followers. Try these steps now to stream your pre-recorded video in a blink! Hopefully, these methods solve your problem.
Also read:
- [New] 2024 Approved Step Into Stardom Building Starry-Eyed TikTok Dances on MacOS
- [New] 2024 Approved Visual Identity Shielding Adding Watermark & Logo to YouTube Media
- [New] Infographic Exploration Premier FIFA Videos for 2024
- [Updated] 2024 Approved Dive Into High Definition FB Streaming in 1080P
- [Updated] 2024 Approved On-the-Spot Screen Savers - Facebook Edition
- 2024 Approved Instagram Photo Frame Sizing Tips
- 2024 Approved Thorough Investigation DJI Inspire 1 Reviewed
- How to Unlock a Network Locked ZTE Nubia Flip 5G Phone?
- How Watermarks Safeguard Your Digital Pictures
- In 2024, How Can I Catch the Regional Pokémon without Traveling On Infinix Note 30 VIP Racing Edition | Dr.fone
- In 2024, How Can We Bypass Realme 12+ 5G FRP?
- Prévisions Pour L'essor De La Main-D'oeuvre Numérique Dans Les Entreprises (Plus De 50% D'augmentation en 2021) – Étude Détaillée Par ABBYY
- Streaming Success Live TikTok Broadcasts on Computers for 2024
- Title: [New] Integrating Past Videos Into Current Live Feeds on FB for 2024
- Author: Michael
- Created at : 2024-12-01 01:06:52
- Updated at : 2024-12-07 23:22:20
- Link: https://facebook-video-recording.techidaily.com/new-integrating-past-videos-into-current-live-feeds-on-fb-for-2024/
- License: This work is licensed under CC BY-NC-SA 4.0.